文章目录
- 一、环境配置与功能测试
- 1.1 安装
- 1.2 目标检测
- 1.3 实例分割
- 1.4 分类
- 1.5 姿态检测
- 二、训练数据标注
- 三、数据集训练方法
- 3.1 命令训练
- 3.2 代码训练
前言:需要先安装CUDA和Anaconda,它们的安装参考我这篇文章:Ubuntu配置深度学习环境(TensorFlow和PyTorch)
一、环境配置与功能测试
1.1 安装
新建一个虚拟环境下安装:
#新建虚拟环境
conda create yolov8 python=3.8
#激活虚拟环境
conda activate yolov8

pip install ultralytics
源码安装:
#激活虚拟环境
conda activate yolov8

# 源码安装时,要单独安装torch,上面已经安装,这里就可以忽略
conda install pytorch==2.0.0 torchvision==0.15.0 torchaudio==2.0.0 pytorch-cuda=11.7 -c pytorch -c nvidia

git clone https://github.com/ultralytics/ultralytics.git
cd ultralytics
# 安装依赖
pip install -r requirements.txt
1.2 目标检测
#激活虚拟环境
conda activate yolov8

#官方的测试案例进行程序的推理测试:
yolo task=detect mode=predict model=yolov8n.pt source=/home/zard/Pictures/2.jpeg  device=cpu save=True show=True
# 任务模型task=detect,YOLOv8可用于检测,分割,姿态和分类
# 会自动下载权重文件https://github.com/ultralytics/assets/releases/download/v0.0.0/yolov8n.pt到当前目录
# 推理的数据为source
# 这是CPU进行测试的,将device改为0用GPU
结果如下,结果保存在当前路径下的runs/detect/predict文件夹中:
Ultralytics YOLOv8.0.145 🚀 Python-3.7.16 torch-1.13.1+cu117 CPU (12th Gen Intel Core(TM) i5-12500H)
YOLOv8n summary (fused): 168 layers, 3151904 parameters, 0 gradients

image 1/1 /home/zard/Pictures/2.jpeg: 480x640 4 persons, 5 cars, 1 motorcycle, 1 suitcase, 32.9ms
Speed: 1.8ms preprocess, 32.9ms inference, 0.7ms postprocess per image at shape (1, 3, 480, 640)
Results saved to runs/detect/predict

GPU运行
yolo task=detect mode=predict model=yolov8n.pt source=/home/zard/Pictures/1.jpeg  device=0 save=True show=True

Ultralytics YOLOv8.0.145 🚀 Python-3.7.16 torch-1.13.1+cu117 CUDA:0 (NVIDIA GeForce RTX 3060 Laptop GPU, 5930MiB)
YOLOv8n summary (fused): 168 layers, 3151904 parameters, 0 gradients

image 1/1 /home/zard/Pictures/1.jpeg: 448x640 7 persons, 6 cars, 2 buss, 6.8ms
Speed: 1.5ms preprocess, 6.8ms inference, 0.8ms postprocess per image at shape (1, 3, 448, 640)
Results saved to runs/detect/predict2
也可以输入文件夹,处理多张图片:
yolo task=detect mode=predict model=yolov8n.pt source=/home/zard/Pictures/  device=0 save=True show=True
Ultralytics YOLOv8.0.145 🚀 Python-3.7.16 torch-1.13.1+cu117 CUDA:0 (NVIDIA GeForce RTX 3060 Laptop GPU, 5930MiB)
YOLOv8n summary (fused): 168 layers, 3151904 parameters, 0 gradients

image 1/3 /home/zard/Pictures/1.jpeg: 448x640 7 persons, 6 cars, 2 buss, 7.0ms
image 2/3 /home/zard/Pictures/2.jpeg: 480x640 4 persons, 5 cars, 1 motorcycle, 1 suitcase, 6.9ms
image 3/3 /home/zard/Pictures/3.jpeg: 448x640 7 persons, 1 car, 2 trucks, 3.7ms
Speed: 1.8ms preprocess, 5.9ms inference, 0.6ms postprocess per image at shape (1, 3, 448, 640)
Results saved to runs/detect/predict3
1.3 实例分割
#激活虚拟环境
conda activate yolov8

yolo task=segment mode=predict model=/home/zard/yolov8s-seg.pt source=/home/zard/Pictures/2.jpeg device=0 save=True show=True

# 自动下载权重文件https://github.com/ultralytics/assets/releases/download/v0.0.0/yolov8s-seg.pt

1.4 分类
yolo task=classify mode=predict model=yolov8x-cls.pt source=/home/zard/Pictures/2.jpeg device=0 save=True show=True
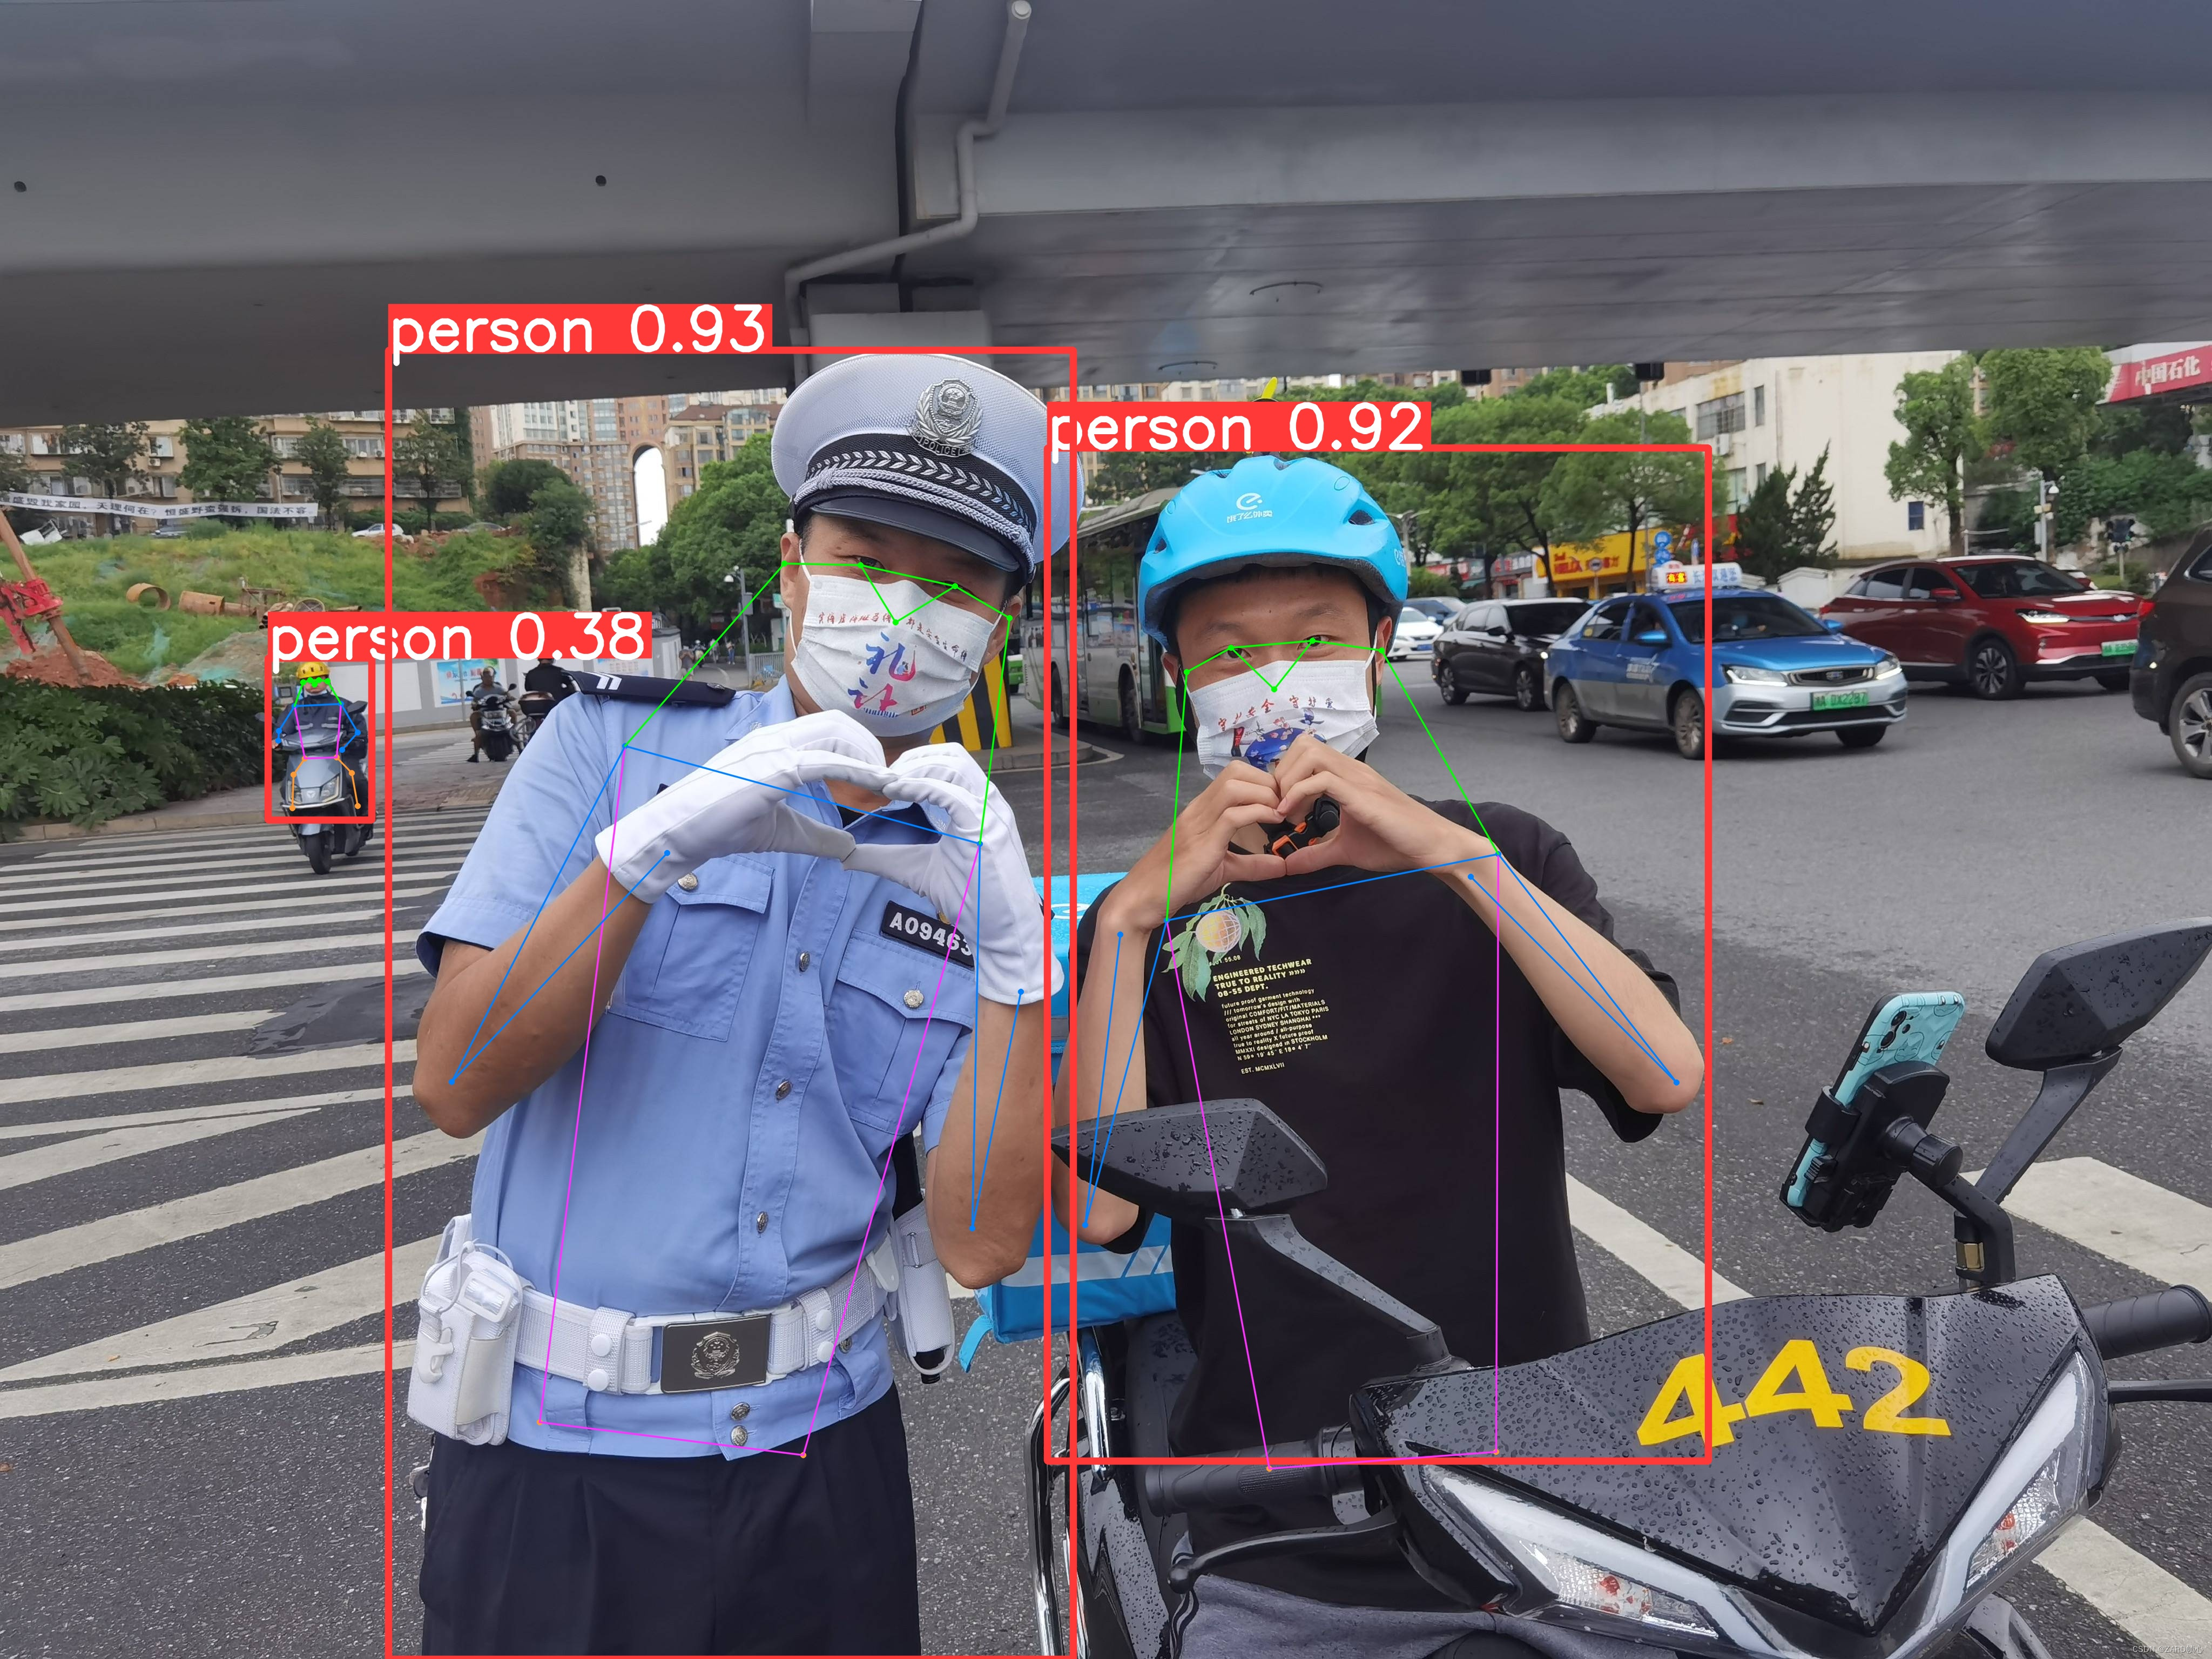
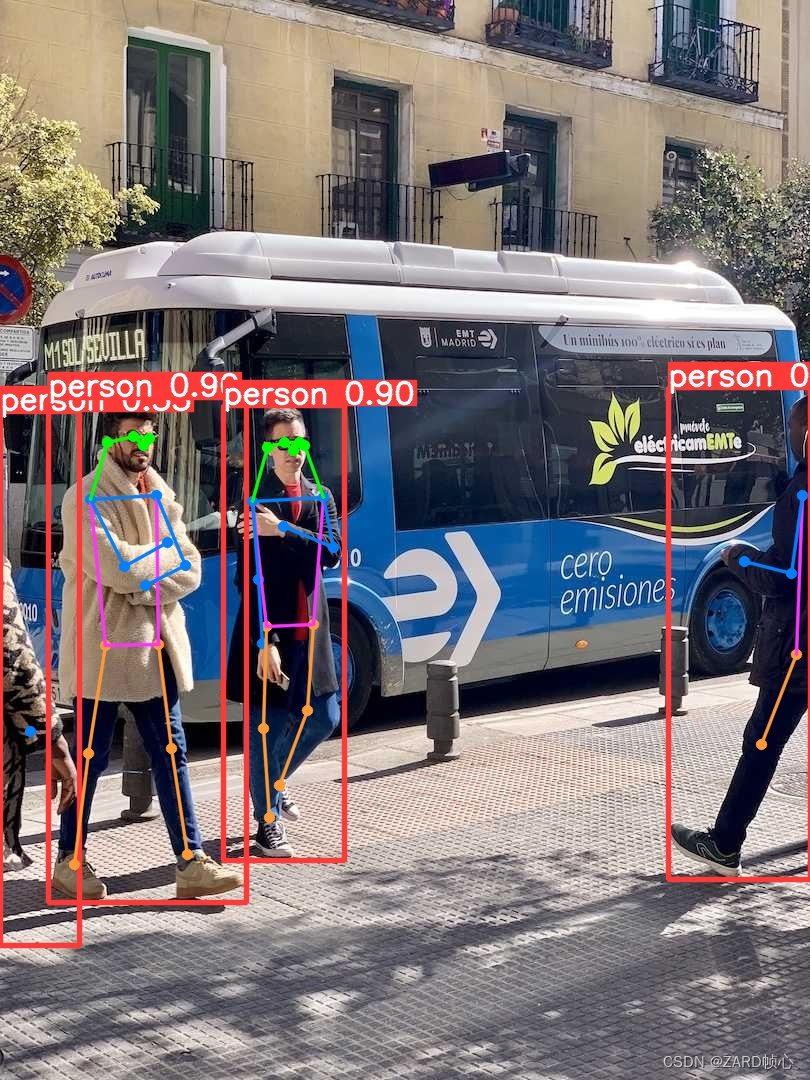
1.5 姿态检测
yolo task=pose mode=predict model=/home/zard/yolov8s-pose.pt source=/home/zard/Pictures/2.jpeg device=0 save=True show=True
二、训练数据标注
安装数据标注环境:
#激活虚拟环境
conda activate yolov8
pip install labelImg

labelImg
LabelMe允许用户在图像中绘制边界框、多边形、线条和点等来标注不同类型的对象或特征。也可以标注标注类别,用户可以定义不同的标注类别,使其适应不同的项目需求。每个类别都可以有自己的名称和颜色。我这里从网上随便找了一些狗子的照片示例:
选择要标注的数据和输出目录:

更改数据的标注结果格式,点击save下面按钮选择输出为YOLO

点击Creat RectBox框选目标,填入标签:

每一帧标注完成后均要点击save,会在输出路径下生成结果,其中.txt文件包含图片中的物体信息及对应的位置之类的,class.txt列出所有的标签:

三、数据集训练方法
标注完成后,创建data文件夹,并在images中放置所有标注原图,labels保存每个图片对应的标签文件(.txt),dataSet用来保存数据集划分,例如训练集、验证集和测试集,通常以文本文件的形式列出每个数据集中的图像名称或ID,使用下面脚本生成数据集划分:
python">#!/usr/bin/env python
# -*- coding: utf-8 -*-

import os
import random
import argparse

parser = argparse.ArgumentParser()
# 标注文件的地址,根据自己的数据进行修改
parser.add_argument('--label_path', default='./labels', type=str, help='input label path')
# 数据集的划分,地址选择自己数据dataSet下
parser.add_argument('--txt_path', default='./dataSet', type=str, help='output dataset path')
opt = parser.parse_args()

# 训练与测试数据集比例
trainval_percent = 1.0
train_percent = 0.9
labelfilepath = opt.label_path
txtsavepath = opt.txt_path
# 读取所有已经标注文件的名称
total_label = os.listdir(labelfilepath)
if not os.path.exists(txtsavepath):
    os.makedirs(txtsavepath)

num = len(total_label)
list_index = range(num)
tv = int(num * trainval_percent)
tr = int(tv * train_percent)
trainval = random.sample(list_index, tv)
train = random.sample(trainval, tr)

file_trainval = open(txtsavepath + '/trainval.txt', 'w')
file_test = open(txtsavepath + '/test.txt', 'w')
file_train = open(txtsavepath + '/train.txt', 'w')
file_val = open(txtsavepath + '/val.txt', 'w')

for i in list_index:
    name = total_label[i][:-4] + '\n'
    # 排除掉生成的classes.txt文件
    if name=='classes' + '\n':
        continue
    if i in trainval:
        file_trainval.write(name)
        if i in train:
            file_train.write(name)
        else:
            file_val.write(name)
    else:
        file_test.write(name)

file_trainval.close()
file_train.close()
file_val.close()
file_test.close()
再用下面脚本将数据组织成Yolov8需要的形式(训练与验证数据集下均包含图像与对应的标签文件夹):
python">#!/usr/bin/env python
# -*- coding: utf-8 -*-

import os,shutil
rootpath="/home/zard/Pictures/data/"#待修改路径
# 输出路径
imgtrain=rootpath+"train/images/"
imgval=rootpath+"val/images/"
labeltrain=rootpath+"train/labels/"
labelval=rootpath+"val/labels/"
if not os.path.exists(imgtrain):
    os.makedirs(imgtrain)
if not os.path.exists(imgval):
    os.makedirs(imgval)
if not os.path.exists(labeltrain):
    os.makedirs(labeltrain)
if not os.path.exists(labelval):
    os.makedirs(labelval)

f = open(rootpath+"dataSet/train.txt","r")
lines = f.readlines()
for i in lines:
	shutil.copy(rootpath+"images/"+str(i).replace('\n','')+".jpg",imgtrain+str(i).replace('\n','')+".jpg")
    shutil.copy(rootpath + "labels/" + str(i).replace('\n', '') + ".txt", labeltrain + str(i).replace('\n', '') + ".txt")

f = open(rootpath+"dataSet/val.txt","r")
lines = f.readlines()
for i in lines:
    shutil.copy(rootpath+"images/"+str(i).replace('\n','')+".jpg",imgval+str(i).replace('\n','')+".jpg")
    shutil.copy(rootpath + "labels/" + str(i).replace('\n', '') + ".txt", labelval + str(i).replace('\n', '') + ".txt")
shutil.copy(rootpath+"dataSet/train.txt",rootpath+"train.txt")
shutil.copy(rootpath+"dataSet/trainval.txt",rootpath+"trainval.txt")
shutil.copy(rootpath+"dataSet/test.txt",rootpath+"test.txt")
shutil.copy(rootpath+"dataSet/val.txt",rootpath+"val.txt")
然后编写ymal文件,${Youpath}替换为你的路径:
train: ${Youpath}/data/train/images
val: ${Youpath}/data/val/images
test: ${Youpath}/data/test/images

# number of classes
nc: 1

# class names
names: ['dog']
然后去Yolo源码里找到yolov8.yaml参数文件,复制一份并修改:
nc: 1 # number of classes
最后的文件结构如下,蓝色文件夹下均为图像和对应的标注文件:

3.1 命令训练
#激活虚拟环境
conda activate yolov8

cd ${Youpath}/data
yolo task=detect mode=train model=yolov8.yaml data=dog.yaml batch=32 epochs=100 imgsz=640 workers=16 device=0
model部分可以进行模型的选择与更改,其余的参数都可以根据自己电脑的性能进行修改。训练完成后就可以进入runs文件夹下面看自己的训练成果:

结果如下,包括一些图表和验证结果:其中weights下包含两个训练的权重文件(最好的和上一次的)

利用训练得到的权重推理:
#激活虚拟环境
conda activate yolov8
yolo task=detect mode=predict model=best.pt source=15.jpg  device=cpu save=True show=True
由于就只有十几张图片,没有训练出来效果就不展示了
best.pt还可以作为下一次训练的初值:
#激活虚拟环境
conda activate yolov8
yolo task=detect mode=predict model= ./runs/detect/train/weights/best.pt source=15.jpg  device=cpu save=True show=True
3.2 代码训练
训练:
python">from ultralytics import YOLO

# Load a model
# model = YOLO('yolov8n.pt')  # load a pretrained model (recommended for training)
# model = YOLO('./runs/detect/train/weights/best.pt')  # load a pretrained model (recommended for training)
model = YOLO('yolov8.yaml')  # load a pretrained model (recommended for training)

# Train the model
model.train(data='dog.yaml', epochs=100, imgsz=640,workers=16 device=0)
运行,与上面效果是一样的:
#激活虚拟环境
conda activate yolov8
python3 train.py
推理:
python">from ultralytics import YOLO
from PIL import Image
import cv2


model = YOLO("runs/detect/train/weights/best.pt")
# accepts all fonmats - image/dir/Path/URL/video/PIL/ndarray. 0 for webcamresults = model.predict(source="0")
# results = model.predict(source="0") # 用摄像头
# results = model.predict(source="folder",show=True)# Display preds. Accepts all YoLO predict argument


#from PIL
im1 = Image.open("15.jpg")
results = model.predict(source=im1, save=True) # save plotted images

#from ndarray
# im2 = cv2.imread("test.jpg")
# results = model.predict(source=im2,save=True,save_txt=True) # save predictions as labels
# #from list of PIL/ndancay
# results = model. predict(source=[im1, im2])
运行:
#激活虚拟环境
conda activate yolov8
python3 train.py